Ensuring your toilet flange is set to the right height is essential because the wrong height may cause your toilet to leak.
But what’s the right height for your toilet flange, you may ask? Stick around to find out in this informative guide.
You’ll also find solutions to fixing a damaged or broken flange, along with so much more helpful information.
The appropriate height for your toilet flange is 1/4 inch above the finished floor. If it’s higher, it causes the toilet to wobble and leak. To prevent leaks, you can increase the height, or shorten the pipe, then replace the flange. Another option is heating the 3″ pipe at the ridge and stepping to avoid corroding the pipe.
Having a toilet with bad drainage can be uncomfortable to use and frustrating, especially when you’re not able to fix it yourself.
Thus, in this article, there are some easy fixes to resolve some plumbing issues with or without a professional.
By the end of this guide, you should have no problem fixing any toilet-related issues yourself.
Ready for a Flooring Quiz?
Can my Toilet Flange be 1/2 Inch Above the Floor?
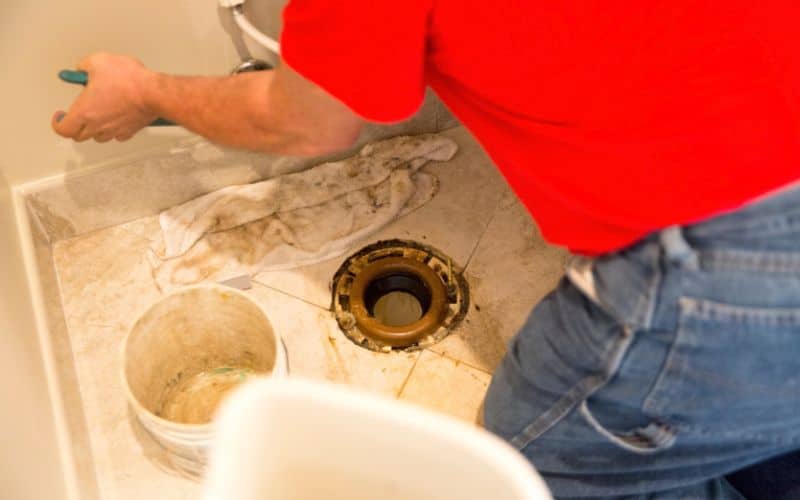
While it’s technically possible for a toilet flange to be 1/2 inch above the floor, it’s not the recommended or ideal height.
The optimum height for a toilet flange is 1/4 inch above the finished floor.
Setting the flange to this height usually allows you to use almost any type of wax ring, ensuring a secure and stable installation.
If the flange is higher than this, you can use a thicker wax ring or toilet spacer to balance it.
However, these solutions aren’t always recommended since they may cause more problems with your toilet flange.
Thus, the best option is to remove the current flange, shave or cut the excess from the floor flange ring, and install a new toilet flange at the appropriate height.
Nonetheless, it’s also best to consult with a plumber or a professional to ensure a proper installation.
Furthermore, having a toilet flange 1/2 inch above the floor level can cause issues with the proper sealing of the toilet to the waste pipe and may lead to wastewater leakage.
This leaking happens when the wax ring between the flange and the toilet isn’t strong enough to properly compress and seal due to the height difference.
In addition, having the flange too high can cause the toilet to rock back and forth, potentially causing damage to the toilet and the flange over time.
Therefore, the recommended height for the toilet flange is to have it flush with the finished floor surface or no more than 1/4 inch above the floor level.
How High Can My Toilet Flange Be Above Floor?
Ideally, it’s best to aim for a 1/4 inch height above the finished floor to ensure proper sealing and prevent leaks.
Installing your toilet flange at a height of 1/4 above floor level may be ideal, but it also comes with some setbacks.
Here are some pros and cons of installing your toilet flange at a level of 1/4 inch:
| Pros | Cons |
|---|---|
| Prevent leaks | Increased height |
| Easier to install | Requires an extender |
| More stable | Non-compliance with code |
| Better for uneven floors | Not suitable for all toilets |
| Accommodates thicker flooring | Can trap debris |
Additionally, the exact maximum height of a toilet flange may depend on the specific type of toilet and wax ring you’re using.
Although, the best height for a toilet flange is installing it above the finished floor and perfectly level. The optimum flange height to aim for is 1/4 inch above the finished floor.
However, plumbers around North America install toilet flanges anywhere from the floor level to five inches above the floor.
In general, the best practice is installing the toilet flange above the finished floor of your bathroom.
If the flange is flush with the floor surface or even below, it may cause leaking issues or other problems.
What Should I do if The Toilet Flange is not Level?
If the toilet flange isn’t level, always try to correct the issue before installing the toilet to prevent any possible leaks and ensure a proper fit of the toilet.
There are different methods to correct an uneven toilet flange, such as shimming the flange or leveling the subfloor or surrounding structure.
Depending on the severity of the unevenness, it may be necessary to remove the existing flange and install a new one that’s level with your toilet.
Although it’s a general recommendation to consult with a professional plumber for assistance with correcting an uneven toilet flange to ensure it is done correctly and safely.
Similarly, if your toilet flange is not level, it can cause problems with toilet installation and lead to leaks or other issues.
In some cases, it may be possible to correct the problem without replacing the flange. For example, you could use shims to level the toilet.
Also, you can attempt to use a flange extender to raise the flange to the correct level, which is usually 1/4 inch above the ground level.
However, if the problem is severe or the flange is damaged, you may need to replace it.
It’s best to ensure the new flange is installed correctly and sits flush with the floor to prevent future problems.
If you’re unsure how to proceed, consult a plumber or other professionals to help you assess the situation and determine the best course of action.
What are the Best Practices When Installing a Toilet Flange?
Whether you’re new to the plumbing industry or a pro, you might need a quick memory refresh in terms of this particular installation process.
Thus, the best practices when installing a toilet flange include the following:
- Installing the toilet flange above your finished floor rather than flush with the floor or below it.
- Use an extender or a thicker wax ring if the flange isn’t at the correct height.
- Make sure the toilet flange is properly secured to the subfloor.
- Checking for leaks and ensuring the toilet is stable after installation.
#1. Installing Toilet Flange on Finished Floor
Installing a toilet flange above the finished floor is considered one of the best practices for toilet flange installation.
The flange should be installed flush with or above the finished floor. That helps create a sturdy and secure base for the toilet, ensuring that it’s firmly in place
Also, it prevents leaks between the toilet and the drain pipe. Additionally, this practice allows for easier installation and replacement of the toilet should it become necessary.
Installing a toilet flange flush with the finished floor can lead to some issues in the long run. According to the search results.
So, it’s best to install the toilet flange on the finished floor rather than flush with the floor for a few reasons.
Firstly, it can be challenging to get a proper seal if the flange is installed flush with the floor, which can lead to leaks.
Secondly, if the flange is installed too low, the wax ring that seals the toilet to the flange can become compressed, leading to leaks.
Finally, if the flange is installed flush to the floor, it can be difficult to install or remove the toilet if needed in the future.
Therefore, it’s best to install the toilet flange on top of or slightly above the finished floor to ensure a proper seal and easy installation and removal of the toilet.
Installing a toilet flange below the finished floor can cause leak paths to form because the flange won’t be at the proper level to create a secure seal with the toilet.
This can lead to water leakage, which can cause damage to the surrounding area and create health and safety hazards.
To prevent this, always use an extender kit to ensure that the toilet flange sits above the finished floor or is at the correct height.
If the flange is significantly below the floor level, you may need to modify the plumbing or find other ways to achieve the proper level.
#2. Using an Extender
If your toilet flange isn’t at the correct height, you can use an extender or a thicker wax ring to properly install a toilet.
A flange extender is a plastic or metal ring that sits on top of the existing flange and raises the height of the flange.
To use an extender;
- First, turn off the water supply to the toilet and remove the toilet.
- Then, remove the old wax ring and clean the area around the flange.
- Place the extender on top of the existing flange, securing it in place with screws. Once the extender is in place, replace the wax ring on top of it.
- Finally, re-install the toilet and tighten the bolts.
However, if you prefer to use a thicker wax ring, try not to stack multiple regular wax rings together, as this tends to leak.
Instead, look for special extra-thick wax rings designed for use in cases like this. Simply place the thicker wax ring on top of the flange and below the toilet. Then follow the standard installation procedure.
However, you should remember that not all toilets are compatible with thicker wax rings.
So it’s always best to check with the manufacturer’s instructions or a professional plumber before proceeding.
It’s also worth noting that some flange extender kits already have a wax ring installed. In this case, simply place the extender on top of the flange, then install the toilet as usual.
#3. Properly Securing the Toilet Flange
Properly securing your toilet flange to your subfloor is important in ensuring your toilet is stable and doesn’t leak.
Try installing the flange above the finished floor so the height of the flange is level with or no more than 1/8″ above the finished floor.
This prevents rocking and provides a tight seal between the wax ring and the toilet. To secure the flange to the subfloor, you can use screws and attach the flange to the subfloor.
You should then slide the toilet flange bolts inside the flange and tighten the washers and nuts securely.
It’s important to ensure the flange is securely attached to the subfloor and doesn’t move when installing the toilet.
If the subfloor around the drain is damaged, you may need to call a plumber to remove and replace the flange.
Also, if you have any doubts about the installation process, it’s always better to call a professional plumber to ensure the job is done correctly.
#4. Check For Leaks
To ensure that there are no leaks and that the toilet remains stable after installing a toilet flange, you should follow these steps:
- Check the height of the toilet flange to ensure it is at the right level. If the flange is too low, you can use flange extenders to bring it up to the correct height.
- Ensure the flange is securely placed and leveled on the drainpipe.
- Use flange bolts to secure the flange to the floor, tightening them gradually and alternating between each bolt to ensure even pressure.
- Apply a plumber’s putty or silicone sealant to the base of the toilet before placing it on top of the flange. The sealant will provide an additional layer of protection against leaks.
- Tighten the toilet bolts gradually, alternating between each bolt to ensure even pressure until the toilet is securely fastened.
- Check the toilet for any rocking or wobbling. If it does not sit firmly on the floor, use shims to stabilize it.
- Finally, check for leaks by flushing the toilet and inspecting around the base for any water dripping or seepage.
If you notice a leak, you may need to reapply the sealant or tighten the bolts further.
Remember to follow the manufacturer’s instructions and use the appropriate type of flange for your situation (e.g., PVC for a PVC pipe connection).
In summary, It’s always important to follow these best practices to avoid future problems with the toilet, such as leaks or instability.


