Many homeowners have to turn off the water supply throughout the house to repair a leaky faucet because they do not have shutoff valves under the sink.
Shutoff valves are an important feature as you can use them to quickly stop the water supply from the sink in case a flood or strong water pressure causes leakages.
You can easily install valves under each sink in your bathroom if there are none. Also, if the shutoff valves under the sink are damaged, you can easily fix them or replace them with new ones that are the same as the original.
With fixture shutoff valves, you can cut off the water supply in your sink without the main shutdown. They are also very handy in the event of leakage in the sink.
So, if there isn’t a shutoff valve in your sink or the valve is damaged, you can get all the information you need to install or replace the valve from this article.
Can a Bathroom Sink Come Without a Shutoff Valve?
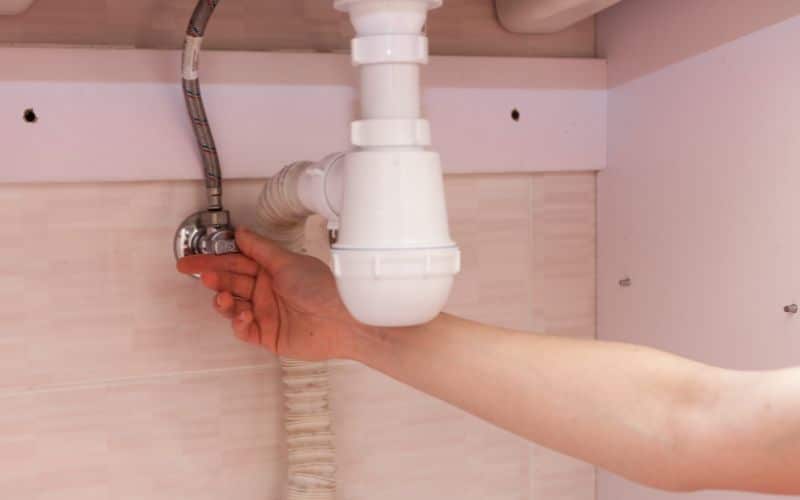
The bathroom sink can come without a shutoff valve; in that case, you will always have to turn off the water flow from the main shutoff valve or the meter setter in the basement.
Some homeowners do not install individual shutoff valves in each bathroom sink. Contractors sometimes neglect to do so, and the homeowners don’t pay attention to it either.
So, while a building is supposed to have shutoff valves in each bathroom sink, you may find no shutoff valves under any of the bathroom sinks.
So, some bathrooms do not have shutoff valves installed because of negligence from the contractor. But shutoff valves can be useful for turning off the water in the sink.
With shutoff valves, you can cut off the water supply to the sink without turning off the water supply in the whole building.
However, some contractors don’t install their valves, and even those that do install them sometimes use very cheap valves that sometimes leak.
When you find no shutoff valves in your bathroom sink or the valves are damaged, you can install the valves or replace the damaged valves with new ones that look identical.
How to Install a Shutoff Valve Beneath Your Sink (Step-By-Step Guide)?
Ideally, you shouldn’t turn off your home’s entire water supply system to fix a leaky faucet. But several homeowners often find themselves in those exact conditions.
And that is because they don’t have individual shutoff valves installed and often risk having their homes flooded. If so, you can install valves on each hot and cold water supply tube.
Once you do that, you can turn off the water supply to one sink without interrupting the other sinks or turning off the water supply to the rest of the house.
The good thing is that it is not very difficult to add shutoff valves to a sink; it is a simple process that you can do yourself, even when you’re not a professional.
Before installing a shutoff valve beneath the sink, you have to consider the type of valve you will use and the type of pipe that supplies water to the sink in your bathroom.
There are two types of shutoff valves that you can use for your bathroom sink; if the water comes into the bathroom sink through the floor, you’ll have to use a straight stop valve.
But, if the pipe supplying water to the bathroom sink enters the sink through the wall behind the sink, you will have to install a right angle.
Secondly, you must consider the type of water pipe that supplies the water to the sink. If the water pipes are made of copper, they require a compression fitting.
The compression fitting has a ring and a nut; that is how it connects and tightens on the pipe, so you do not need to solder it.
On the other hand, if you have galvanized iron water pipes, you’ll have to use a shutoff valve that comes with female iron pipe threads.
When you’ve decided on the shutoff valve that you need, you can choose the installation method that works best for you depending on the type of shutoff valve you decide to install.
#1. Angle Stop Valve
If installing the angle stop valve, follow the following instructions closely.
- Turn off your home’s main water supply, flush the toilets, and run the faucets to drain all the water from the pipes.
- Carefully loosen the tube that supplies water to the sink from the wall end of the pipe with a wrench.
- Unwrench the compression nut, and take it off with your fingers.
- Disconnect the pipe end attached to the sink with the basin wrench and grasp the stub coming out of the wall with a wrench.
- Remove the adapter from the stub with a wrench, and clean out the pipe.
- Apply a generous layer of pipe joint compound. Thread on the shutoff valve, then grasp the pipe stud with the pipe wrench and use the adjustable wrench to tighten the pipe.
- Apply some pipe joint compound to the threads on the shutoff valve.
- Then, screw on the new water supply tube and connect the supply tube to the faucet using the basin wrench.
- Turn the water supply back on.
#2. Straight Source Valve
Just like angle stop installations, straight stop installations are straightforward.
- Use a wrench to remove the water supply tube, loosen the compression nut, and then remove the old adapter.
- Apply some pipe joint compound on the new valve’s threads, then push the new valve into the pipe stub coming out of the floor.
- Push the compression nut upwards and screw it into your new shutoff valve, and use an adjustable wrench to tighten the nut.
- Put the water supply tube back on the valve and the faucet, then turn on the water supply.
How to Replace a Broken Shutoff Valve Under Your Bathroom Sink (Step-by-step Guide)?
The shutoff valves in your bathroom must always be in working condition because they can be useful if a faucet becomes leaky or water pressure causes a pipe to burst.
Normally, you don’t use the valves often, so the plastic and rubber parts in the shutoff valves can become worn over time, become brittle, and start to leak.
Before you attempt to replace a faulty valve, you can try a simple solution to fix the valve. If the fix does not work, you can try replacing it.
Here are the steps to do that;
- Try to turn the handle; if it doesn’t turn, spray it with spray lubricant, then wait five minutes before you attempt to turn it again. Repeat if it doesn’t work.
- Tighten the packing nut to prevent the valve from leaking, then wrap a piece of cloth around the valve, which is located under the valve handle.
- Grip the nut with adjustable pliers and give it a clockwise one-eight turn. This may cause the rubber and plastic parts inside to compress and stop the leak. If not, disassemble the valve.
- Cut off the water supply to the sink; if the valve you are fixing is a hot water valve, put off the hot water outlet on the heater.
- If it is also a cold water valve, you can find the main water supply to the house and turn it off. This control is usually located next to the water meter.
- Use a Philips screwdriver to unscrew the handle, then turn the packing nut counterclockwise to loosen it. Take out the nut and remove the valve stem.
- Use a piece of dry clothing to clean the washers and bend them forwards and backward to make them supple.
- Cover the rubber parts thinly with the plumber’s grease and put the valve back together if you have disassembled it.
- Finally, tighten the packing nut, screw the handle back on, and turn the water supply on.
If you turn on the water when you’re done and the valve leaks, you’ll have to replace it. Also, use a hacksaw to cut off the brass compression ring before installing a new valve.
Also, if the valve has other defects, like a broken handle or a corroded faucet connection, you’ll have to replace it.
Always fix or replace a leaky valve as soon as possible; in a short time, the water can cause damage to the framing and the floors.
How Much Does it Cost to Replace a Sink Shutoff Valve?
Depending on your location, replacing a standard under the sink valve will cost you anything between $150 and $240.
A standard under-the-sink valve ranges from $10-$30; the price depends on the choice of valve that you make or the valve your particular system requires.
There are two different valve types that you can use under the sink; you can use a right-angle stop valve or a straight stop valve if the water enters the sink through the floor.
Although the parts, such as the valve, are quite cheap, the labor costs more money, usually the labor that adds most of the cost.
Plumbers usually charge by the hour, so sink shutoff valve replacement could range from $40-$200 per hour, depending on your location and how extensive the labor is.
If the valve is buried and the plumber has to dig it up from the basement, it will cost you more. But, if the valve is in an easily accessible location, the job will be easier, and the plumber will charge less.
However, always ask for the quotes before the plumber gets to work. If the job is simple, it will cost way less than $200, including labor and materials.
Installing a main shutoff valve ranges from $170 to $250 per valve. However, the price will depend on the job size, finish options, and conditions.
The average cost for materials in the US is $34 per valve, so labor and materials usually come between $170 and $250.
So, replacing valves under the bathroom sink is less expensive than replacing the main valves, but knowing the lowest, highest, and average prices can be useful.
Below is a table showing the price differences.
| Range | Cost |
|---|---|
| Lowest cost | $170 |
| Average cost | $210 |
| Highest cost | $300 |

